Wool Dyeing weather

The day was scheduled for an indigo vat at a play day with Liz.  I awoke to thunder and rain. Booo…hissss…All week long we had carefully compared weather reports for her house in Missouri and my house in Arkansas but Mother Nature threw us a curve ball and we cancelled at 7 AM.  Within an hour the sun came out at my house and I had all this yarn ready to dye.  

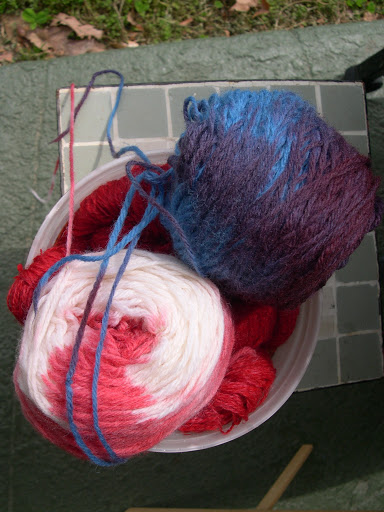
The white and blue cakes were salvaged from an unfinished wool afghan bought for $4. It yielded 8 cakes of 3 colors so it was a real bargain.  But, the colors were boring.  Then my friend Linda gave me 8 skeins of vintage Spinnerin yarn. It is an interesting combo of wool and slubs of linen…but it was a pretty unflattering color of hot ping.  

I used a package of scarlet Rit dye for the bath. I divided it in half so I could do both a cotton bath and a wool bath. Cotton requires adding salt and wool needs to be acidic with vinegar added to the bath.  The pink skeins were rewound into hanks that could be twisted and I left the cakes as they were. Into the dye they went. The pink was submerged but the cakes were put into a plastic container and dye was poured into the middle and down one side until it was about 2 inches up the side of the cake.

Getting ready to unwind the cakes and skeins to dry. These have already been rinsed and squeezed out till the water was clear. 

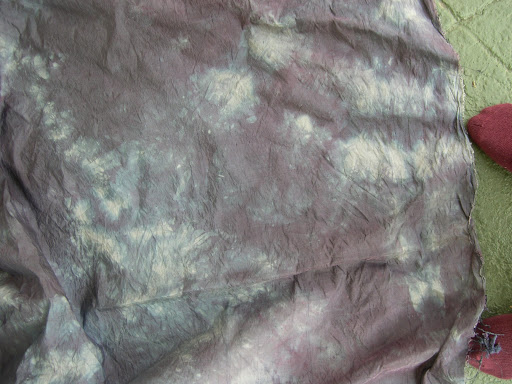
Isn’t this white great? Look how it grades from red to white as it is unwound.

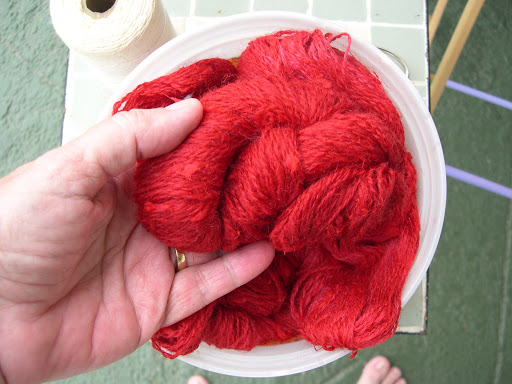
This is what the pink and white skeins looked like out of the dye pot. The very bottome photo shows some of the variation in the skein and the original pink.

Yarn hanging to dry outside to take advantage of the warm southern wind.

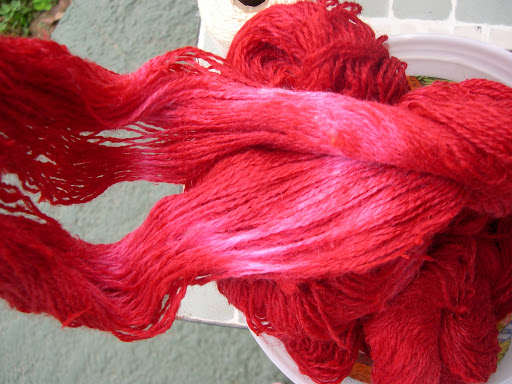
You can really see the variations in the yarn dyed this way. The tighter you wind the skein, more variation you will get in the finished color. Think of it as tie dyeing for yarn.  The bonus for this yarn was that the hard finish on the Spinnerin vintage yarn seemed to disappear in the hot water dye bath. The finished yarn is luscious and soft.

check out all the other creative projects at 
Off The Wall Friday

Pay it forward…in the mind of the reader

While watching the morning news I saw a young woman reading her op-ed piece she had sent to the Wall Street Journal about being rejected by some colleges. You can read some of the story here if you missed it, or you don’t subscribe to the WSJ (I don’t).

I thought the piece was funny and a little satirical. Here is a smart young woman who was probably told all her life that she could be anything she wanted to be and go to any school she wanted. And she got rejected by Ivy League schools.  Remember, I was listening to her read the piece with all of her tonal qualities exactly the way she intended it to sound.  The problem for this young woman has been caused by other people reading her comments without the expressions she intended to convey. There are a lot of people who think she is a spoiled brat because of what they think she meant rather than reading what she really said. Think of your favorite comedian….if you read their performance without knowing it was from a comedian, you would probably be offended and irate.

It drove home a point that I think all of us should consider when we read online what someone says. It can be a list serve, a yahoo group or just an email. So many people go off half-cocked and perceive negative tones that maybe really aren’t there. Friendships are lost, flaming occurs and many people have their blood pressure raised unnecessarily.

In the spirit of making my little part of the Internet a nicer place, I promise to think twice and read more than once with an open mind before I interpret something I read as negative.  Will you pay it forward? I Will.

Dyeing Black with Rit Dye

NO, this isn’t a what’s for dinner post. Although, this is my most favorite sherbet and brand of cottage cheese.  We save these containers for use to store Beneful for the pups in small quantities that are easy to take along if we go on a trip. But they also get confiscated for use in the studio, too.   The box of Rit dye is Black. A local store had a basket of black Rit marked for less than $1 so I stocked up. Black is such a hard color to dye.  MX dyes can be cantankerous so I figured what did I have to loose by trying these out.  

 I am getting ready to start a quilt to jury  for the Pet Project special exhibit at Houston and I need a lot of variations of black. This was a perfect time to try this cheap Rit dye.  

The first photo is a piece of high thread count cotton that started as the palest taupe color that is not quite white. I bought an entire roll a couple of years ago for $5 at a yard sale. It has a wonderful hand and dyes beautifully. I used it almost exclusively for indigo dyeing a couple of years ago and loved the results.

The next piece I used was a pale tan piece of dupioni silk. That is shown in the bottom picture with my toes and at the left next to the cotton. The silk actually came out darker but I love them both. 

So here is what I used the containers for.  The cottage cheese container was used to pre-mix the powdered dye in 1 cup of boiling water.  Then I used the sherbet containers for the fabric. I added salt to the container for the cotton; about 1/2 C and 1 C boiling water before I scrunched the fabric in. For the silk piece I added 1/2 C vinegar and 1 C boiling water before scrunching the fabric. 

 Then I took the pre-mixed Rit and poured 1/2 over each of the tubs of fabric and topped them off with just enough boiling water to cover the fabric. I popped the lids on and let them sit until this morning. 

I tossed both into the washing machine for a rinse cycle and then a full wash cycle. I checked both by rinsing under the faucet to  be certain the loose dye was gone.  I’m pretty pleased with how these came out for a minimum of effort.  I’m extra pleased because that store had Orange Rit in the close-out bin this week. Guess I have more dyeing to do.  AND its the weekend so I’m linking this to Off The Wall Friday

The Mother of Invention….or the cheap way to do things

 Some of you know that I had a blog called “Quilting on the Cheap”. I wrote it as a direct answer to all the quilters, both traditional and art, who said you have to buy your fabric at the local quilt shop [LQS].  They rarely get my money since I can find more than enough fabrics for under $1 a yard and sometimes $0 a yard. 

Because of my passion for saving our earth by keeping as much out of the landfill as possible I repurpose what I can.  I was in need of a portable design wall. I’ve used about everything other’s have suggested as well as a couple of my own inventions. I’ve used a roller shade with thin flannel glued to it and a bamboo shade with flannel on one side. Both of these were OK but still had to have someplace to hang. I wanted something I could fold away and not deal with at all. 

So my mind had been working for possibilities. I had seen one of these projection screens at a thrift shop but felt it was too much money. Or at least more than I wanted to spend until I knew if it would work out the way I envisioned.

Then this week I found the one I wanted to try for $3. We tested it to make sure all the springs and adjustments worked before we bought it. The beauty of this is that it is very compact by itself as you can see in the first photo. The photo on the right shows the screen folded up with the flannel clipped on the top rail. It is still compact but simply unclip it and fold the flannel up if you want. 

 This is the naked screen. It can be adjusted from the the top or the bottom.  I hemmed heavy weight drapery flannel liner on the top and bottom with fusible tape to make this as easy as possible. Then I used large binder clips to attach it to the top rail and small clips to stretch it across and clip on the sides. 

We sometimes go on extended stay vacations in a small 26 ft. long motor home. This will be perfect since it will fold up to be put away in the small closet.

I thought about putting velcro tabs to attach it, or eyelets on the top and screws in the rail to attach it. All those were too labor intensive and I wanted this project to be quick and dirty for all of you.  I submitted this to Fons and Porter magazine as a quilting tip  but I just couldn’t wait to share it with my readers. This has gotten a huge number of hits but just in case anyone missed it I’m linking up http://ninamariesayre.blogspot.com/

Hopping foot for Sunshine 16

I am happy with my Sunshine except…..I kept breaking threads. Even after adjusting all my tensions according to Todd Fletcher’s method, I still broke thread way too often.  Finally a light bulb went off and I wondered if it had something to do with this machine not having a hopping foot. I went to my Pfaff and stitched a little to evaluate what the difference was between the two. It was clearly the hopping motion that I use to set a rhythm when I stitch.

I wrote Nancy at Sunshine 16 about acquiring a hopping foot and she said NOPE, don’t have one, can’t use one with this machine…no, no, no, no. 

 Since I rarely follow directions of any kind and have mostly made up my own rules, I decided to try to modify my Sunshine myself. Afterall, that is one reason I bought this machine, being able to work on it myself.

 So I got out my antique tin lunch basket full of misc. vintage machine parts to see what I could find. The first thing I did was replace those fiddly little nylon screws with nice large thumb screws that my arthritic fingers could get hold of. You can see one holding the attachment on and the green one is the needle set screw.

Then I found a hopping foot that can be used for free motion quilting, embroidery or darning on vintage machines. I knew that arm was going to be critical for this to work. This was a low shank attachment but it didn’t matter since I can adjust the height of the shaft to allow for different thicknesses of batting and the bar has a spring on it to raise and lower the bar manually. It works perfectly! You can see in the photos the raised and the lowered position of the foot as the needle sews.  I couldn’t be happier with this.   It might be a little ‘in your face’ to the makers, but geesh….listen to your customers. This was not a hard fix at all.